Campaigns
Campaigns are a central concept that allows the assignment of interactions to agents across different channels. You can create the campaigns you need, and within each one, you can enable the channels you desire. Are you ready?
How to create a new Campaign?
Creating a campaign in uContact is very simple! Below, we'll show you how to create it.
- To create a campaign, you have to go to the Administrator menu and access the Campaigns module.
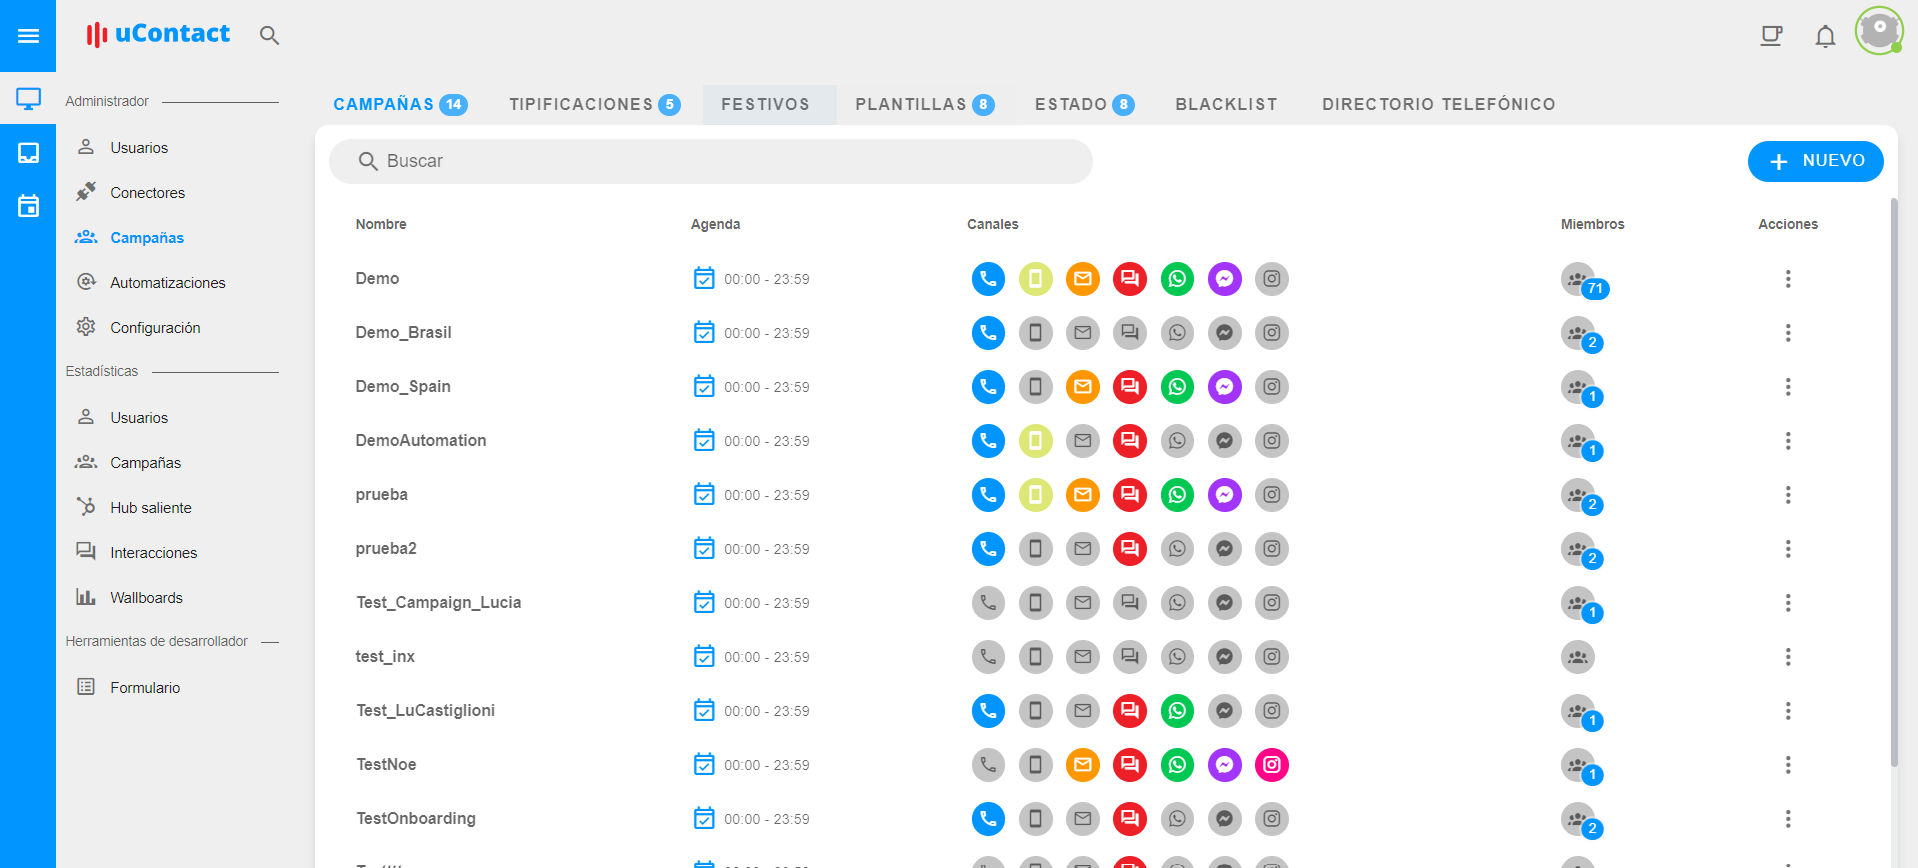
- Once here, you have to press the "New" button, located in the upper right corner.

- Here you must assign a unique name to the campaign, then press the create button, the campaign will be successfully created with default parameters and a 24-hour schedule. However, you can configure different parameters to adjust the campaign to your needs.
Basic
In addition to the name, you can assign a previously created form to the campaign so that agents can use it when receiving interactions.
Schedule
By default, campaigns have an operating schedule, meaning a period of time during which interactions will be accepted and assigned if there are available agents, which is 24 hours. However, this schedule can be modified.
Timezone: Here you can select the timezone of the campaign. Custom Schedule: If you enable this option, you can assign a customized operating schedule to the campaign.
How to create a custom schedule?
Creating a custom schedule for your campaigns is very simple! Below, we show you how to do it:
- Each day has a grid representing the time slot. Simply double-click on the desired time slot to create a schedule, which defaults to 45 minutes but can be extended.
- By default, all days are enabled, but you can disable any days by simply clicking on the day's letter.
- You can create multiple ranges in the same day by repeating the same procedure.
How to extend a schedule?
- By clicking and dragging from the sides of the selected range, you can extend the schedule to suit your needs. Alternatively, you can right-click on the schedule, and with the "Edit" option, you can enter the desired range.
How to delete a schedule?
- To delete a schedule, you can right-click and select the "Delete" option.
How to copy a schedule?
- You can copy schedules to assign them to other days. Right-click on the schedule, select "Copy," then on the grid of the day where you want to place that schedule, right-click and choose "Paste."
- You can also copy all schedules from a specific day to another day by right-clicking on the grid, selecting "Select all," and then copying.
TIPs
You can use shortcuts to create, modify, and delete schedules:
- Press
control + corcommand + cto copy schedules. - Press
control + vorcommand + vto paste schedules. - Press
control + zorcommand + zto undo changes. - Press
control + yorcommand + yto redo changes.
Dispositions
You can create as many levels of classifications as you want. These classifications will be specific to this campaign.
How to create a new disposition level?
- By clicking on the "+" icon, a modal will open to create a new level.
- You must enable the classification and assign it a unique name.
- By default, this level will be assigned to all channels of the campaign. However, you can remove channels by simply clicking on them.
Additionally, you can import a list of classifications to create classifications in the system massively.
Status
You can create custom statuses for campaign members to use.
- You should click on the "New" button located in the upper right corner.
- To create a new status, you must assign it a unique name of your choice, an icon, and a color, which can be one of the suggested ones or you can select one you prefer by clicking on the palette icon.
Templates
You can create templates for users to use when handling interactions in order to improve response times and hence the effectiveness of the support. There are two types: text and rich text format templates.
- Text templates are used for SMS, WhatsApp, WebChat, and Messenger. Simply assign it a name and the desired text. For example: "Welcome {name}! My name is {username} and I'll be happy to assist you today. How can I help you?"
- On the other hand, rich text format templates are used only for Email. Simply assign it a name and then add the text you want using formatting options to structure the message.
Contacts
Puedes crear contactos para la campaña.
Advanced
There are some advanced options that can be configured.
- You can select the campaigns you want to transfer, meaning the list of campaigns that will appear to the user when they want to transfer an interaction from this campaign.
- Additionally, you can assign a quality model to the campaign so that supervisors can evaluate the quality of agent's interactions.
How to set up a new channel?
To start using a campaign, it's necessary to have channels configured to create or receive interactions. Depending on the selected channel, the configuration may vary. Adding a channel is very simple, let me show you how to do it:
- Go to the campaigns option in the Administrator menu.
- You'll see the list of created campaigns. To add a channel, simply click on the channel of that campaign. Once you click, a pop-up will appear to configure the channel.
Below, we'll show you how to configure each channel:
 Telephony
TelephonyGeneral
Here are the parameters related to the channel's operation configuration:
- Enable: Allows enabling or disabling the channel to stop receiving interactions.
- Strategy: Sets the way interactions will be distributed among available users.
- Service Level: Sets a desirable maximum time in seconds for incoming interactions to be attended to by a user. The campaign dashboard will display the percentage of interactions that met this time. If the set time is exceeded, it doesn't mean that the interaction won't be attended to by a user, it just won't affect the Service Level percentage.
- Max Interactions: Indicates the maximum number of interactions, in this case, telephony, that can be queued waiting to be attended to by a user.
- Weight:
- WrapUp: Is the time in seconds that the agent will have available after finishing the interaction. During this time, the agent will not receive or be able to create interactions in any campaign.
- Language: Is the language that will be used when playing audio.
- Survey: If enabled, when the user finishes the call, the client will be redirected to a satisfaction survey about the service received by the user.
- Record: If enabled, incoming calls to the campaign's extensions will be recorded.
- Auto-Answer: If enabled, once a call is assigned to a user, it will be automatically answered without giving the user the possibility to answer the call themselves or reject it.
Inbound
Here's how the incoming call channel is configured:
- Incoming Connector: Here, you should select a connector responsible for receiving incoming calls to uContact. If you haven't created one yet, you can create it from here by clicking on the "+" icon.
- Incoming Numbers:
- Wait Time: Sets the maximum time in seconds that an interaction can be queued waiting to be attended to by a user.
- Retries:
- Entry:
- Exit:
- Round Up in Seconds:
- Agent Delay:
- Virtual Queue:
- IVR: Allows selecting a previously created IVR that will connect with the client once the interaction enters the queue.
- Report Wait Time: If enabled, once the interaction is assigned to the user, before being able to speak with the client, an audio will indicate the client's wait time in the queue.
- Announce Wait Time: If enabled, while the client is in the queue waiting to be attended to, the time spent in the queue will be announced.
- Announce Position: If enabled, the client will be informed of their position in the queue to be attended to.
- Blacklist: If enabled, when the call is received and it's detected that the client's number is on the blacklist, the call will be automatically disconnected, and the client won't be able to connect with a user.
Sounds
- Periodic Announcement Frequency: Sets the frequency in seconds at which the periodic announcement audio will be played.
- Music on hold: Allows recording or uploading an audio file for the hold music that will be played when clients are in the queue. You must select the language corresponding to the audio, and you can upload a different audio for each language.
- After Hours: Enables recording or uploading an audio file for the after-hours message that will be played when a client calls and the campaign is outside of its operating hours. You must select the language corresponding to the audio, and you can upload a different audio for each language.
- Welcome Message: Enables recording or uploading an audio file for the welcome message that will be played when the interaction enters the queue. You must select the language corresponding to the audio, and you can upload a different audio for each language.
- Periodic Announcement: Enables recording or uploading an audio file for the periodic announcement that will be played while the client is in the queue at the configured time frequency. You must select the language corresponding to the audio, and you can upload a different audio for each language.
 IMPORTANT
En caso de que no se seleccione ningún audio, se utilizarán los audios por defecto.
Outbound
In this section, you configure the channel for users to make calls.
- Outbound Connector: Here you must select a connector responsible for making outgoing calls. If you haven't created one yet, you can do so here by clicking on the + icon.
- Maximum Ringing Time: Sets the maximum ringing time in seconds before the call is automatically terminated if the client doesn't answer.
- Outgoing Numbers:
- Blacklist: If enabled, when making a call and the client's number is detected in the blacklist, the call will be automatically terminated and cannot be made.
Try it out!
In the "Try it" tab, you can simulate a real call to verify that the configuration is correct.
How to test?
It's very simple! You just need to enter one of the incoming numbers you configured in the "Incoming" tab into the phone field, and then click on the call button.
If the number is correct, the call will enter the queue and follow the procedure according to the configuration. For example, it may enter an IVR if configured, play the selected audios, etc. Finally, the interaction will arrive in the inbox, where you can handle it.
 SMS
SMS
SMSGeneral
- Habilitar: Enables or disables the channel to receive interactions.
- Connector: Here you should select a connector that will be used to receive and send messages. If you haven't created one yet, you can do so from here by clicking on the + icon.
- Phone Number:
- Strategy: Sets how interactions will be distributed among available users.
- Service Level: Sets a desirable maximum time in seconds for incoming interactions to be attended by a user. Then, in the campaign dashboard, you can observe the percentage of interactions that met this time. If the established time is exceeded, it doesn't mean that the interaction won't be attended by a user; it just won't affect the Service Level compliance percentage.
- Max. Interactions: Indicates the maximum number of interactions, in this case, telephony interactions, that can be queued waiting to be attended by a user.
- Maximum Transfer Time: Sets the maximum time in seconds that the user who was transferred the interaction has to attend to it. After this time, the interaction will return to the initial user who transferred it. If set to 0, interactions will not have a maximum time for transfers.
- Bot on Start: You can select a bot to connect with the client once the interaction enters the campaign.
- Bot on End: You can select a bot to connect with the client once the user finishes the interaction.
- After Hours: This is the message that will be sent to the client if an interaction arrives and the campaign is outside of operating hours.
- Incoming Blacklist: If enabled, if an interaction arrives from a client who is on the blacklist, the interaction will not enter the queue and will not be able to connect with an agent.
- Outgoing Blacklist: If enabled, if a user tries to initiate an interaction with a client who is on the blacklist, the interaction cannot be initiated.
 Email
Email
EmailGeneral
- Habilitar: Allows enabling or disabling the channel to receive interactions.
- Connector: Here you should select a connector that will be used to receive and send messages. If you haven't created one yet, you can do so from here by clicking on the + icon.
- Strategy: Sets how interactions will be distributed among available users.
- Service Level: Allows setting a desirable maximum time in seconds for incoming interactions to be attended by a user. Then, in the campaign dashboard, you can observe the percentage of interactions that met this time. If the established time is exceeded, it doesn't mean that the interaction won't be attended by a user; it just won't affect the Service Level compliance percentage.
- Signature: Templates that can be created for users to place below emails as their signature.
- Confirmation Message:
- Bot at Start: You can select a bot to connect with the client once the interaction enters the campaign.
- Bot at End: You can select a bot to connect with the client once the user finishes the interaction.
- Max Interactions per Agent: Sets the maximum number of interactions from this channel that an agent can have.
- Max Interactions in Queue: Sets the maximum number of interactions from this channel that can be in queue pending to be attended.
- Maximum Transfer Time: Sets the maximum time in seconds that the user who was transferred the interaction has to attend to it. After this time, the interaction will return to the initial user who transferred it. If set to 0, interactions will not have a maximum time for transfers.
- Message to Rate: This is the message that will appear in the email to the client to encourage them to rate the user's service with stars.
- Thank You for Rating: This is the message that appears to the client after they rate the user's service.
- Activate Ratings: If enabled, allows 5 stars to appear at the end of the emails sent by the user to rate the user's service.
- Incoming Blacklist: If enabled, if an interaction arrives from a client who is on the blacklist, the interaction will not enter the queue and will not be able to connect with an agent.
- Outgoing Blacklist: If enabled, if a user tries to initiate an interaction with a client who is on the blacklist, the interaction cannot be initiated.
 WebChat
WebChatGeneral
- Habilitar: Allows enabling or disabling the channel to receive interactions.
- Strategy: Sets how interactions will be distributed among available users.
- Service Level: Allows setting a desirable maximum time in seconds for incoming interactions to be attended by a user. Then, in the campaign dashboard, you can observe the percentage of interactions that met this time. If the established time is exceeded, it doesn't mean that the interaction won't be attended by a user; it just won't affect the Service Level compliance percentage.
- Bot at Start: You can select a bot to connect with the client once the interaction enters the campaign.
- Bot at End: You can select a bot to connect with the client once the user finishes the interaction.
- Send Offline Messages to this Address:
- Maximum Transfer Time: Sets the maximum time in seconds that the user who was transferred the interaction has to attend to it. After this time, the interaction will return to the initial user who transferred it. If set to 0, interactions will not have a maximum time for transfers.
- Max Interactions per Agent: Sets the maximum number of interactions from this channel that an agent can have.
- Maximum Chat Quantity: Sets the maximum number of interactions from this channel that can be in queue.
- Maximum Time: This is the maximum time in minutes that an interaction can be in the queue. After this time, the interaction will be closed, and the client will be notified that the interaction could not be attended.
- Auto-close: Maximum time in seconds after which the interaction will be closed if the client remains in a disconnected state.
- Allowed Domains:
- Enable Feedback: If enabled, allows the client to rate the service provided by the user once the interaction ends.
- Enable Email: If enabled, allows the client to enter their email when initiating the interaction.
- Allow Audio and Video: If enabled, the client can initiate calls and/or video calls.
- Allow Attachments: If enabled, allows clients to send attachments.
- Offline Message: If enabled, when the campaign is out of hours, the client can leave a message, which will generate an interaction.
- Show Phone Number: If enabled, shows the user's extension to the client in the WebChat window.
- Auto-response:
 WhatsApp
WhatsAppGeneral
- Habilitar: Enables or disables the channel to receive interactions.
- Conector: Here you must select a connector that will be used to receive and send messages. If you haven't created one yet, you can do so by clicking the + icon.
- Número de teléfono: Indicates the phone number associated with the channel.
- Estrategia: Establishes how interactions will be distributed among available users.
- Nivel de servicio: Allows you to set a desired maximum time in seconds for incoming interactions to be handled by a user. The campaign dashboard will show the percentage of interactions that met this time. If the established time is exceeded, it does not mean that the interaction will not be handled, it simply will not affect the Service Level percentage.
- Máx. interacciones: Indicates the maximum number of interactions, in this case telephony, that can be queued waiting to be handled by a user.
- Tiempo máximo de transferencia: Sets the maximum time in seconds that the user to whom the interaction was transferred has to handle it. After this time, the interaction will return to the initial user who transferred it. If set to 0, interactions will not have a maximum time for transfers.
- Bot al iniciar: Allows you to select a bot to connect with the customer once the interaction enters the campaign.
- Bot al finalizar: Allows you to select a bot to connect with the customer once the user finishes the interaction.
- Fuera de horario: Is the message that will be sent to the customer if an interaction arrives and the campaign is out of hours.
- Blacklist entrante: If enabled, interactions from clients on the blacklist will not enter the queue or be able to connect with an agent.
- Blacklist saliente: If enabled, users will not be able to initiate interactions with clients on the blacklist.
 Messenger
MessengerGeneral
- Enable: Allows enabling or disabling the channel to receive interactions.
- Connector: Here you must select a connector that will be used to receive and send messages. If you haven't created one yet, you can do so from here by clicking on the + icon.
- Strategy: Defines how interactions will be distributed among available users.
- Service Level: Allows setting a desired maximum time in seconds for incoming interactions to be handled by a user. Then, in the campaign dashboard, you can see the percentage of interactions that met this time. If the set time is exceeded, it does not mean that the interaction will not be handled by a user, it just won't affect the Service Level compliance percentage.
- Max. Interactions: Indicates the maximum number of interactions, in this case, telephone calls, that can be in the queue waiting to be handled by a user.
- Maximum Transfer Time: Sets the maximum time in seconds that the user to whom the interaction was transferred has to handle it. After this time, the interaction will return to the initial user who transferred it. If set to 0, interactions will not have a maximum time for transfers.
- Bot on Start: You can select a bot to connect with the client once the interaction enters the campaign.
- Bot on End: You can select a bot to connect with the client once the user finishes the interaction.
- After Hours: This is the message that will be sent to the client if an interaction arrives and the campaign is out of hours.
 Instagram
InstagramGeneral
- Enable: Allows enabling or disabling the channel to receive interactions.
- Connector: Here you must select a connector that will be used to receive and send messages. If you haven't created one yet, you can do so from here by clicking on the + icon.
- Strategy: Sets how interactions will be distributed among available users.
- Service Level: Allows setting a desired maximum time in seconds for incoming interactions to be handled by a user. Then, in the campaign dashboard, you can see the percentage of interactions that met this time. If the set time is exceeded, it does not mean that the interaction will not be handled by a user, it just won't affect the Service Level compliance percentage.
- Max. Interactions: Indicates the maximum number of interactions, in this case, telephone calls, that can be in the queue waiting to be handled by a user.
- Maximum Transfer Time: Sets the maximum time in seconds that the user to whom the interaction was transferred has to handle it. After this time, the interaction will return to the initial user who transferred it. If set to 0, interactions will not have a maximum time for transfers.
- Bot on Start: You can select a bot to connect with the client once the interaction enters the campaign.
- Bot on End: You can select a bot to connect with the client once the user finishes the interaction.
- After Hours: This is the message that will be sent to the client if an interaction arrives and the campaign is out of hours.